Today when I got home, I checked the length of the chain and pendant and THEN I bent the prongs over the glass.
Here is the final piece on ME! I have also added a few more picture on my Metals 2010 page
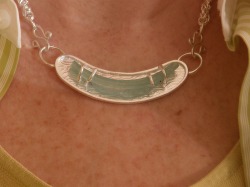
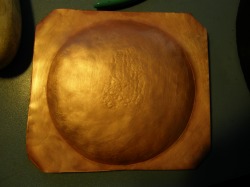
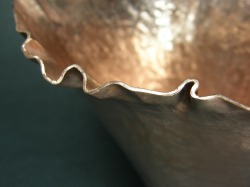
I finished my Byzantine chain, made the S-hooks and then put everything in the vibratory tumbler yesterday.
Today when I got home, I checked the length of the chain and pendant and THEN I bent the prongs over the glass. Here is the final piece on ME! I have also added a few more picture on my Metals 2010 page Over a year ago, I bought some roman glass to use in some jewelry. It has been sitting in my stash box waiting for inspiration.
On July 4th I worked at the San Diego Fair, again, but not for the Volunteers for Minerals. I worked for a friend who has a jewelry booth and he sells jewelry made with roman glass and small bags of roman glass shards. It is from him that I bought the glass oh so long ago. While in the booth I was able to spend more time looking at some of the construction techniques. While much of what was in the cases had thicker glass or was perfectly encapsulated in gold and silver there were several pieces that reminded me of the "Captured Objects" style I had seen demonstrated up at Metals Week by Joanna Gollberg who was leading the class titled "Trapping Found Objects" I had finally found my inspiration! Saturday, I pulled out my glass and selected two pieces. One would be used for a necklace and the other would be cut in two for a pair of earrings. Both pieces appear to be the bottom rim of bowls or vessels and have part of the bottom which is thick and some of the side walls which is very thin. I spent most of the day shaping the glass to remove the sharp edges; rolling out my silver and adding a texture; cutting, drilling and soldering a frame on to the back plate. It was a total of 10 hours on Saturday Sunday I soldering the prongs, rings to attach to the chain and I started to work on the Byzantine chain. The chain will be short enough to have the finished piece just lay at the base of my neck. I will have 2 hooks of some sort [yet to be designed] for each connection so IF I want to use a different chain (maybe a longer viking knit perhaps) I can change it out. I spent about 5 hours on the project Sunday. I have not attached the glass at this point because once I do, I can't/shouldn't put it in the polisher - which is where it is right now. I have to be ABSOLUTELY positive I am done with any changes I might make. I am hoping to get the chain hooks soldered and then get the chain into the polisher tonight. Then I can check it all tomorrow and Wednesday set the glass. Go over to my Metals- 2010 page to see some of my first pictures. End of Day 1:
What a day, so much information! Today we made our forges and pounded on tool steel. Now we are about to see a slide show of the instructors work. Gotta go but tomorrow will post more and pictures to follow. Day 2 and starting Day 3: Yesterday I finished the first two tools - a straight liner and a curved liner. I had done the hot forging- that's hammering with a big 2 pound hammer and anvil, on Sunday. And thanks to Elisa, I now have the "Anvil Chorus" running around in my head! Monday was all about filing and sanding to the correct shapes. I completed all that work by 4pm. So the last hour before we shut down for the day was spent hardening and tempering. Today we are making texture tools but I migh actually rework some of the Grobet tools I have as they are too sharp and there is still the hammer I want to re-shape as well. So, off to class I go! Day 3 done and starting Day 4: Wow, I am learning so much in the tools class. Yesterday I did get my liners hardened, cleaned and tempered. Then Val gave a lecture on making texture tools and after lunch everyone set off to make theirs. I on the other hand consulted with Val on modifing my hammer. I did not have to anneal it nor remove the handle - though I think next time I will, and I went at the first face with my files. I have never done so much filing in my life and there is still more to be done. By yesterday afternoon I had finished filing and sanding one side of the hammer. Today I polished the first side of the hammer and I am working on reshaping the other side. I am also working on a "hoof" style tool for my chasing and repousse. Time to return to class. More tomorrow and there will be pictures posted over the weekend. Day 4 Complete and Day 5 in-progress: Yesterday I reworked the second half of the hammer - it was not "just right" - The entire process would have been much easier if I had a belt sander and removed the handle, actually the hammer would have been done the first day. But I did not have access to a sander here at camp - so I forged ahead [yes that was a bad pun] with my files, sanding sticks, vice and vice grips. FOUR hours later I was done and really pleased with the hammer modifications I had made. I have never done so much filing in my life at one time. I know there will be more filing in my future though, and it will be easier and faster. I spent the afternoon making a sheep's foot planisher and finished it just before we broke for the potluck and silent auction. I was in bed and asleep by 8:45 pm (and probably snoring too) Today is the last day and so when I got into the workshop I took out a piece of tool stock that was 1/4" or even 3/16" diameter to make a thin pusher/embosser tool. I am working on a trinket tray and I have been using a dapping punch for the repousse. It is the right diameter but not long enough to make a good continuous depression. The new tool, which is now done gives me more length so I can work more area with each hammer mark. After I finished that tool, I refined my undercutter and made a matting texture tool. It is now lunch time so when I go back I will have time to make one more easy tool and then I will have to pack up my tool box and help clean the space where all six of us, from the Tools class, have been working. I am glad I am not the one who has to wash that floor though as it is covered with bits of slag from the forging and all the coarse and fine dust from the filing and sanding. My hands are a mess - I have knicked my knuckles and fingers in 8 places from file scrapes or running my hands into the bench pin. There there is the dirt under the nails, around my cuticles and in the creases of my hands. And then there is the ache in my hands from holding the tools too tight while I work. Am I complaining? NO - this has been a great fun and I can only imagine what I will make next year. As for my hand, I figure a good soak in warm water and soft scrubbing and my hands will be almost clean enough At Home and Recovering: Metals week is now over. :=(( On Thursday afternoon we finished up our final tools and arranged them for display at the final reception where work from all of the classes would be shown. We had to put away all of our tools and return the workshop tools to the tool room. Everyone in our class traded names, addresses - email and home and even phone numbers so we could stay in touch as well. Then at 4:00 pm the reception started and we could look at all the other work. There were many amazing pieces from the other classes - you just wanted one of everything the work was that amazing. At each classes display many of us asked how this or that was made and when you got around to your own display sure enough, some one asked you how you made your items! During this everyone was taking pictures of the work, and toward the end we were taking pictures of the people we took the class with and with your instructors. After that it was back to the cabin, open a bottle of wine and chat about our time in class and what we plan to do next. Friday morning, Mary and I packed up our belongings, put them in the car and drove back down the mountain. I was home by lunch and then had to unpack and tell all to my sweetie. Go to the Pictures - Classes 2010 page to see more pictures This is the fourth post about the workshop. To read the prior posts scroll down.
Day 4 - Monday and it was our last day. Megan started with a demo of HOT forging tools and she held up a large diameter piece of tool steel and said she was going to use it to make me a tool. That's right folks, I was getting a tool, a big - fat - pusher made by Megan in return for giving her the swirl bowl. WOW! To say I was on cloud nine the rest of the day is an understatement. Megan has a BIG fat pusher that everyone was using and lusting after and I was getting a similar but slightly smaller version of it . While everyone was making hot forged tools, and there were some nice ones being made, I finished my texture wheel. And for texture 8 I ended with a moon scape. This last one was not I had in mind but I ended up cracking the copper and I then turned a mistake into a design element Once that was done, I worked on making a custom bezel cup for a cab I had cut. This technique was discussed at the last workshop and is used as the starting point of the gypsy setting ring shown in Megan's book. I did not finish this - yet, but hope to this weekend. I spent the rest of the time taking pictures and in some ways relaxing. At the end of the workshop we all shared and displayed what the had worked on for the past few days, discussed where we want to go next, when was Megan going to come back. We also talked about starting a small group where we would meet maybe a few times a year and work and share and we tossed some names around like Talk & Tap, Bang & Banter and that maybe we would meet at Jay's studio. We hope to get this going in the fall. And finally - Lesson Learned: Go look at your "finished" piece a week later and use a critical eye; you will see the things you missed or need a tweak. THEN FIX THEM. Lesson Learned: Gelato, every afternoon at 2:00 pm is a great way to take a break from your work. Lesson Learned: If you really, really, really, really want to keep a piece - DON'T SHOW IT TO OTHERS cause they might make you an offer you can't refuse! Lesson Learned: Be willing and open to share your work, you never know what you will get in return. Use this link to view all my pictures under Metals - Classes -2010 My Finished Texture Wheel This is the second post about the workshop. To read the prior post scroll down..
Day 2 - Saturday and we started again at 9:00 am everyone talked about the first day, how tired they were when they got home - there was such a high energy! We started the day with a demo and a show-N-tell where we all brought in pieces we had previously done. It was great to see other peoples work and even a few piece they had purchased. Then we got to work and I flipped my domed copper over, I scribed a small circle in the middle and then divided the larger circle into 8 segments. Each of the 8 segment and in each one, I would do a different technique. After doing the lining, I started my textures. The first three segments were all done from the front side: Arts & Crafts planish, Concrete and Fur. The fourth texture started on the front with lining, then I had to flip the copper over so I could do some repousse and then I flipped it over again so I could add the final textures - I called this wood but I think it looks more like sargasso seaweed. While working on my textures, there was a large amount of sharing between everyone: how did you make that, what tool did you use (Megan brought many of her tools which we could also use on our work, though I did my best to only use my tools when doing a texture); where did you get the inspiration for that; and much more! Of course in the afternoon there was another trip to the gelato store and after class I stayed again, to go to dinner with Mary, Terri and Elizabeth. I was home and a sleep around 10 pm. At one point Megan talked about purchasing tools and mentioned the tool set made and sold by Lisa. I spoke up and told how my husband had bought me the set and that I had it with me. There were looks of envy all around the room and Megan who knows Lisa had not even seen them! They were passed around the room and Megan asked if she could try them to which I agreed. That night just before I went home, I put them on Megan's bench for her to use and the next morning she gave her seal of approval. Personally I think there should be one or two other tools included in the set such as an under cutter and a sheep foot planisher for working on side walls as this would make the set more complete as a starter. Towards the end of the day, a friend of Megan's arrived so they could go to dinner, it was Helen Shirk! We had done a show-N-Tell earlier in the day and some of my vessels were on the table still because some of the other students wanted to take pictures. Well, Helen arrived and I guess she asked Megan who's vessels they were and I was called over and I was introduced to Helen who then asked about them and where I had learned to do raising. I stated that I was still learning but I was taking private lessons from 'Deb Jemmott'. Helen said: "Oh, she was one of my students". Helen also said that I was doing very good work!For more pictures, go to Kernolgy and you can see all the pictures I posted, which are more than I have shown here. Use this link to view all my pictures under Metals - Classes -2010 Texture Wheel Day 2 from the inside Over the Memorial Day weekend, Nancy Megan Corwin returned to San Diego for another workshop. I attended the the first workshop given my Megan which was only 2 days and gave me a great start on my skills. This workshop was FOUR days and I was able to complete the project I had set for myself and then some but I was a very tired puppy Monday night when I got home.
Each of the four days, Megan gave demonstrations in the morning and the afternoon that lasted from 15 minutes to just under an hour and the remaining time during the day was spent working on the technique presented in the demo or on our personal project/goals. For example, we had demo's on tool making which I watched, but because I am in the tools class at Metals Week with Val Link, I only made a brass undercutting tool but I did not grind a tool nor did I hot forge a tool. Besides me, two other students in this workshop (there was a total of 10) also attended the first workshop with Megan back in December - Michael from Chicago and Elizabeth from Oberlin. There was another student had previously taken a workshop with Valentin Yotkov, my friend Mary and Terri who were beginners and the remaining students were at other skill levels so there was a wide range experience. In the last workshop Megan had also brought along many pieces she has made or collected. Some of the items she made were completed or there were multiples of them all at various stages of the process so she could show us this progression. This time Megan also had a new piece - a small vessel by David Huang and we all lusted after it - literally and I think I spoke for everyone when I said that if she turned her back too long, it would be gone! I brought several of my completed pieces so I could get some feedback from Megan on my technique. This was important because just sending pictures to Megan only allows her to see what I have taken a picture of; by looking at the entire piece she could see and point out where areas were good and others still need work. I have to admit that several of the pieces I had not look at since "I finished them" - and as I handed them to Megan I looked and could see areas where I had missed under cutting, and in places the lining was not even. One of the pieces I asked Megan to look at with her critical eye was my Swirl bowl. Yes, there were many little fixes to be done but despite these being pointed out, Megan said it was very good and that she liked it - she liked it so much she wanted it. Oh - gosh, now what do I do? Do I give it to her, ask for money - ask what she would like to buy it for; ask for a trade because having one of her pieces would be great but it would certainly be worth waaaaayyy more than my piece. I had to think and ponder, so I let is stew in my brain for another day or two. As mentioned in a previous post, I have a set of the Nechamkin tools . On Lisa's website, she has a texture wheel that was made with the tools in this basic set. My goal for the workshop was to work on surface textures using these basic tools - not texturing tools made specifically for texturing. I thought I would use Lisa's texture wheel as my inspiration and see what I could do. I spent most of Day 1 making a circular shallow dome, not a hemisphere, on which to do my textures. In the afternoon of the first day, Mary and I took a break and went to the Chocolat shop on the corner. You could stand there and try each and every flavor they had, all 16-20 of them. I settled on combo of the dark chocolate and pistachio - it was wonderful and some of the best I have ever had. YUMMY. After 4:00 pm, 8 of us took a side field trip to the Taboo Studio where I saw some amazing work; spoke to one of the owners; and she gave us post cards from prior shows. After visiting the gallery we went out to dinner and I did not get home until 10-ish and my husband wanted to hear all about the day and I was in bed and snoring an hour later. Here is a picture of my sampler at the end of the day and you can view all my pictures under Metals - Classes -2010 I have been working on (raising) this for over two months. There have been several side projects along the way - another tray and some copper clay.
See the entire vessel in the pictures gallery. I just posted a few pictures of three things I have recently finished. Go have a look at the Metals 2010 page.
Project 1) The necklace was made using scrap silver that I cast into an ingot, then rolled out and roller printed. I then had to saw, file and drill each square so I could mount them on the chain I had made. Project 2) This is a repousse sample I made as a test to see how the designs would look. I plan to use these in some of the trinket trays I make Project 3) Glider - this started as triangle of flat copper. I had some problems because I did not have the right size stake when I started. A new one was acquired and then it came into shape really easy. I have been working on some repousse using a copper bowl I made. The bowl is only about 2.5" diameter so it is not large and it fits nicely into the pitch pot.
Yesterday I did a post over at Adventures of an Aspiring Silversmith. I spent today mostly planishing the outside and adding texture but I am not done yet. I have added more pictures to the Metals page if you want to see more.... I now have to decide what to do, if anything on the inside - since the bowl is small most people will see the inside before they ever see the outside surface. I just did a final post over at my other blog Adventures of an Aspiring Silversmith. You can read all about the copper tray I finished.
If you want to see the tray, go to Pictures - Metal Work |
About LaurieLaurie lives in central Texas with Erich, a.k.a. "the shop elf", her hubby of 35+ years and Cowboy Boots, the cat; her metals studio including 100+ hammers and 300+ chasing tools; her sewing studio which has a sewing machine, a closet filled with fabric, hundreds of skeins of embroidery floss and perle cotton, silk and other materials, and Mrs. King the dress dummy; two weaving looms, assorted knitting needles, tubs of yarn; lots of books; plus a plethora of geeky tech gadgets, computers, and more. Archives
April 2024
Categories
All
|